Tuesday, December 28, 2010

RSC front fender, part 3

Some more progress on the front fender, I didn't feel like it for a long time, so I did a lot of other small stuff but now it is really comming together.

I pressfitted the rods to the fender stays using 2 pieces of steel with half of a round hole cut out of both of them. The rod is now stuck in the stay and will be hold in place by some glue* when all is done.
(special glue also used for putting lining onto brakeshoes)
I bent the stays so they meet up with the fender, that is how it now holds the fender over the tire.

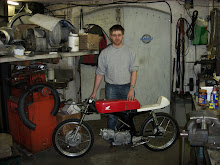
A view of the bike with the fender, for the bigger picture, I like it.

Next step will be to make some reinforcements to go under the fender and riveting it all together. I allready made a mold for the rivet heads by pressing a ballbearing into a piece of aluminium.

pedals part deux

part three is still to come, my pedals aren't finished yet, but they are mounted and functional, when I have a rear brake cable made.

brake pedal still needs some "teeth" so I won't slip off.


Shift lever and linkage, with a hole drilled thru the pedal, like some original RSC/RC/CR levers had.

Connecting rod had to be bent to match up to the engine, so only threaded at one side for adjusting.

some more progress on the Oudshoorn

My dad did a lot more small jobs on his BMW and I helped a little.
I had some tickle style headlamp brackets at home, that were supporting a CB72 headlight on my desk (my kind of paperweight) I fitted them to the ceriani/van bockel forks with an original BMW headlight my dad still had. It has clearly been on a caferacer before, as there are some extra holes and switches and there was only a tacho mounted, no speedo.

Also mounted the levers, they are reproductions of the old tommaselli levers, they fit well with the original tommaselli throttle that I allready found in the bottom of a drawer.

And for when it will not be ridden with a sidecar, a kickstand is fitted. Not the original as the bracket on the frame was ground down, this was made using Honda C50 kickstands and the end is off a Honda brakepedal. Mounted to a 10mm steel plate which sits between the frame and engine instead of original bushings.

Sunday, December 19, 2010

first modifications for the C110

I've done the first modifications on the C110, I don't plan on drastically changing the bike, just some different but if possible original parts.
I had a NOS C110 taillight that I bought for my SS50 motorcycle, but now I think this is a more fitting place to mount it.
I think it goes better with the round backside of the seat then the taillight that was on here.

Just need the correct screws to mount the glass, as honda used abnormal threads in the early days. This needs M3x0.6 while normal M3 has 0.5 pitch.
I didn't paint the taillight because I'm thinking of changing the color to red anyway.
For now this light is on so I can drill the holes in my licenceplate in the correct spot. It still has to be made, but the paperwork has allready arrived.
Date of admission to public roads is set at 1968, taken from the swiss paperwork, so I'm allowed to get an old blue licenceplate for the bike.
(modern bikes have to have ugly yellow plates in Holland)
This also means I had it approved as a small motorcycle, not a moped, so it's legal to bolt on some "go-faster" bits.

Sunday, December 5, 2010

My new bike

Yesterday my dad and I went to pick up a new bike.
This one has been on my wishlist for a while, and when I saw this one for sale on the internet, it looked perfect for me, complete with all the right parts.
It was a 180km ride to get it, and we were lucky that on the way there all the roads were clear, but the way home took a bit longer. The view from the passengerseat:


It is a C110 with Swiss paperwork, and because in Switserland you are not allowed to have a passenger, it had an original racing seat. (as seen on ebay for many $$$)
It is unmolested, allmost all original parts with original bolts, so a good place to start a restoration.


I'm not quite sure what I want to do to it, keep it mostly as it is, or change it to more of a CY110 with racing parts, like this bike found on a japanese blog called oldsportsrider
And for tuning purposes I've got an extra engine with the bike, so I can keep it running while building a faster engine.


I must admit, I goes a bit far to buy a bike to use some parts you allready had, but I will be mounting the original breather set on this bike that was in my closet for a long time.

Only need to make the lid for the labyrinth as I don't have that, but a friend has one that I can probably borrow to copy it.

pedals

The last week I've been working on my brake and shift pedals for the RSC90. I have footpegs that are original CYB72 as also seen in RSC90 pictures, but I don't have the pedals that belong to it, and as they are very rare, I don't think I will ever find them.
So I decided to make my own, in the same way I made them for my CB50 and SS50.
I will be making them out of alloy, original would be chromed steel, but I don't want the hassle of chroming.
For now, this is how my brakepedal turned out:

I made it narrower where it mounts to the peg-brackets so it will be easier to put the bike on the paddockstand. The cable mount is different because original CB72 cables are hard to find and/or expensive.
And I want to make a grooved pattern in the pedal itself, but I don't know how I want it to look yet. After that, there will be some more smoothing and rounding off edges to make it look like a sandcast pedal.

This was made by welding some pieces of scrap aluminium plate together and then a lot of sanding and filing.
As you can see here, what is the beginning of my shiftpedal: