Sunday, December 23, 2012

Tank Coating, part deux

My tank is being painted, thanx dad.
We had a big can of red, so that's what color the tank is going to be. Decided to remove the old emblem mountings as they were pretty mangled, probably will look better with a classic set of honda wing stickers and some silver stripes running along the length, just like the old RC tanks.

I'm liking the way this looks, might just put it back on my SS50Z moped, to make it look more like the way it used to, long ago:
Same tank by the way, one or two crashes earlier...

Sunday, December 9, 2012

122cc motor cylinderhead

Done a little bit of work for my S90 in between all the other projects.
The plan is to build another engine, bored and stroked to 122cc by using ATC110 parts, cylinder, crankshaft and head. Only the ATC110 head has separate valve seats which are pretty thin, which means there is not enough material in them to install a bigger inlet valve.
A while ago I recieved a head from someone, probably C90, that had a full cast in combustion chamber, much easier to put a larger valve in there, but this head didn't fit the ATC110 cilinder.
I had to machine the space for the top of the cilinder, and also the studbolt hole where the oil comes up, as the ATC110 has a large rubber collar there and the C90 head didn't have a space for it.

ATC head on the left, C90 on the right.


the valve I plan on using compared to the original S90 inlet valve


when made to fit the head, this motor will breathe a little easier.

Sunday, December 2, 2012

little changes

Some little changes have been made to my SS50, just a crappy pic in the dark, but it's wintertime, it gets dark soon and I didn't have my exhaust mounted in time to make pictures in the light.
Custom painted tank emblems, exhaust that came off my motorcycle, different seat, CB50 shocks and a slightly different taillight (short lens type)


Friday, November 30, 2012

BMW front forks

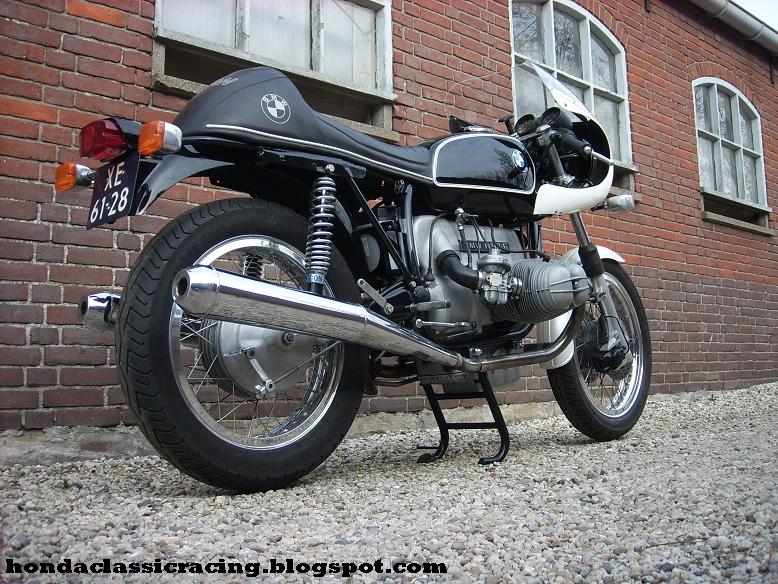
I've done a lot with the front forks of my BMW, stiffer springs, more preload, thicker oil, shortened original springs...
I pretty much had a good setup for a while, eccept for the occasional tankslapper at slow speeds.
Back in the day, they sold tubular fork braces, that I thought would make a great period specific addition to my bike, so I bought one off ebay, mounted it to my bike and as the weather was sort off nice, I had a testride.


I wasn't at the end of the street yet, or I had the worst tankslapper yet...
I had hoped this would be pretty much the answer to all problems, but it turned out to open up a whole new can of worms.
What to do now?
Another period upgrade for the front forks were alloy top yokes that clamp the forklegs instead of the original bolted connection. I've seen them on ebay, and they are not cheap. But what I've seen before, was that some people make their own by using a bottom yoke as a top, and as we had some bottom yokes laying around, I started adapting one.


In the picture you can see what will be the underside of the top yoke, I machined it down so my clip-ons could remain as high as possible for comfortable road use.
I also machined the center hole to fit the stemnut.
and then mounted it, as it was still sort of nice weather, I had a testride.
Yess, this made a dramatic inprovement in handling, not perfect yet, but were atleast getting close again. Now that the forks are much stiffer, I might just need thinner oil again.


Now I just need to finish the yoke, some more material needs to be machined off to be able to tighten the stemnut, I'm just not sure yet what to do.
Leave it as is, showing the raw casting with the numbers and logo, or machine the whole top flat and polish it to get one flat shiny surface....what do you think?

Sunday, November 11, 2012

Tank Coating

My dad has been working on one of his Beemers, that will need its tank coated...this got me thinking about an old SS50zk1 tank I had laying around.
When coated it would be usable again, if something could be done about the mangled filler opening.
And so this project began:


the original opening has been cut out and replaced with an original Honda flip-up cap that was cut out of a CB-motorcycle gas tank.
I never really liked the looks of an SS50z tank, but this really makes it a lot better.
I might even use this tank for my race project, otherwise it will be a spare, or for sale.

Sunday, September 23, 2012

A bit of old news

It's a bit of old news, but my camera broke, so no pictures for a while.
My dad and I went to the Ital-dag, even though I don't really have a close connection with italian bikes, sometimes you need an excuse to go for a ride.
Ralph made some pictures, also at the parking lot, and I really liked this one, the state of my dad's Oudshoorn BMW at the moment:
Behind it, my R90/6 joe-bar caferacer, compare the size.

Saturday, September 8, 2012

Cool stuff.......oil, that is

I had this idea for a while, just been looking for the right parts.
Don't know if I really like the look, but it was fun to build, something unique, I mean, how many C110 oilcoolers have you seen?


Friday, August 24, 2012

CB72 freshened up

After last years season, the CB72 had its motor taken out because of a gearbox problem, and it pretty much sat at the end of the workbench for the whole winter.
A couple of months ago, my dad fixed the gearbox, and as we got the bike out of the corner, we did some slight modifications.
The rear wheel was swapped for one with an original hub, and a rim that matches the front. A front fender was made. (the dutch honda moped freaks might recognise it as a rare C320 fender) And the tank got some new stickers.


and the top yoke was swapped for one that has been welded shut and ground down to look like an original CYB yoke.

It is still a racebike, so it shows signs of use, but these little things just freshen the bike up a bit and make it look more like the honda's we all know from back in those days.

Saturday, August 11, 2012

Kijima dress up kit for C110

Here you see my C110 Kijima dress up kit for the C110 engine I've been building.
Clutch, points and valve covers with some extra cooling capacity.


those of you who know the Kijima catalog are now questioning what this is, they are actually left side head covers for the OHC engines, modified to fit C110. Valve covers also need to be modified, or they jam against the rocker cover of a pushrod motor.
The motor I've built for Ralph also had these covers, it was his idea and I "borrowed" it for my own motor.

Didn't do much with the motor lately, as my SS motors kept givving me problems, but that is prety much over now, so I had time to spend on this little 60cc pushrod powerplant. It's almost ready now, just waiting for some special bolts and I want to do something special with the oil-line...to be continued.


Sunday, August 5, 2012

clutch swapping

With the SS50 race project being for sale, the chance exists I could actually sell it to someone and I didn't really want to loose the Takegawa clutch that was on that motor. So I decided to switch it over to my 110cc engine.

Now the motor is rebuilt...again... with a 5speed gearbox, Takegawa clutch updated to 4 plates with some leftover china junk.

But that meant I had to start building a new engine for the racebike.
SS50Z cases, 5speed gearbox (and a spare 4speed close ratio) clutch moved to the gearbox input shaft by using chinese parts combined with a little bit of Kitaco, 85cc piston (allowed by the SAM) on a 12v crankshaft.
I have some plans for the head, but I'm not that far yet.
yesterday I did start on something for the breather, made it out of a CL72 filler neck that will get a bung welded on the rear to attach a hose.
It looks way high now, but imagine an upswept exhaust running just underneath that.

Saturday, July 7, 2012

New shifter

No longer a mangled CB72 shifter, but homemade alloy.
Also ran the rod over the top instead of the bottom, to get more clearance in all directions. Sort of CR93-ish.


Testride today went okay, the final transmission might be a bit high for this 110cc motor, with 16/33 sprockets. It does 100km/h in 3rd gear, but it doesn't really pickup in 4th unless I've got a tailwind.

Friday, July 6, 2012

SS50 Update

New alloy rear fender with C110 taillight.
And a homebuilt exhaust, 32mm pipe with megaphone muffler with internal silencer.


after I took this picture, I removed the front winkers, as the rear ones now no longer have a mount. Someday I'll put the winkers back on, maybe in a different position.
For tomorrow I want to finish the new shifterpedal and if there is time left, try a big carb, If it works that would be nice for the caferacerdag
Let's hope the newly rebuilt 110cc engine holds up, with a "normal" 4speed gearbox.

Friday, June 29, 2012

White tank look

Both white covers for my C110 were in, so I put them on to have a peak at what it would look like. I am planning on changing the color of the bike to red, but I couldn't decide what color the tank and covers should be.
Lucky I have an extra tank and almost 2 complete sets of covers in white and red, so I will be able to choose when everything is painted.

"Small" ride

Last weekend I couldn't sleep, at about 4:30 sunday morning I decided to go and do something, so I took the BMW for a small ride.
Over a 1000km's for a cup of coffee under the eiffel tower, there and back in one day. Paris traffic is a disaster, but it was great to have done this.

Tuesday, June 12, 2012

Gearbox trouble

I've had a lot of gearbox problems, 2 of my 5speed gearboxes had problems, meaning I had to open up all of them to solve the problem. We've probably found it now as I've built one 5speed motor under my ss50 and it rides great. Also put on some original Benly mudguards to replace the aftermarket ones and built a low exhaust from an original HM065k1 silencer and an aftermarket C100 downpipe. And then gave the bike a quick clean and polish so it looks fresh for summer. The motor I wanted to put under this bike turned out to have a kickstarter problem, so that will need to be openend up again, and still need to look at one more 5speed motor and 2 4speed motors with shifting problems. I won't have to be bored for now.

Friday, May 25, 2012

old rearsets recycled

The old rearsets that came of my SS50 motorcycle are not wasted, they have been recycled on the SS50 racer project. Makes it more of a complete bike real quickly.
Anyone interested in a SAM racebike project? I have so much projects I might never finish this one, so it is for sale.

Rearsets for the SS50

Okay, it took a while, but finaly some pictures. The brake pedal, with just enough room to have the kickstarter underneath, theoretically it is possible to start the engine, although with the high compression it is difficult. Need to find me some different kickstarter pedal some day.
Shifter pedal, will need to build something for this, I can't get enough angle underneath the footpeg, so I will probably make something more like a CR93 shifter.
The way it looks now:
I didn't feel like making another bracket for my low exhaust, so I put this thing on, that I once bought for the header, but didn't use. Kind of like the scrambler look so I'm thinking of putting on normal handle bars. Or just keep going with the cafe-racer look and fit a long tank and bumstop seat......I don't know yet. For now, the motor is out again, I made a mistake on the 4speed close ratio gearbox, and it is too close for street use, so I will probably put a "normal" 4 speed in this motor. Or maybe even a 5speed, as I think I've figured out what is wrong with the 5speed design.

Thursday, May 3, 2012

SS50 rear sets sneak preview

Yesterday I did a lot of work on my new rear sets for the SS50, they're almost done now. Here is a picture of one of the brackets that will hold the CB72 footpegs.
The splined surface that the pegs will mount to is actually a BMW /6 passenger peg mount. After this ofcourse came some modelling with the grinder, rounding the edges and so on. the brackets have since been primed, painted and mounted. A pair of old CB72 pegs have been bent back into shape, blasted and painted. Might have them zinc plated some day, but for now I want to ride. Rebuilt the brakecable to fit these pegs, made a bracket for the brakelightswitch and built a custom shifter-rod. Shifter pedal will need a replacement some day as it was totaly mangled, but for now I can get into gear. Today I hope to finish everything and take it for a testride.

Monday, April 30, 2012

Testride

For a long time I have been wondering what to do with my SS50 motorcycle, I planned on putting a long racetank on it, with a short bum-stop seat, but I wondered what that would ride like in combination with my rearsets and clip-on bars. Thus I quickly made some brackets to fit a cheap seat to my SS50, looks odd with the big space between the seat and tank, but it was just for testing. The tank that should go on there would fill the gap.
however, this rode like sh!t, I'm constantly resting on my arms..... My plans needed to be changed, so I tried some things when back in the workshop; normal handlebars...don't like the look, but then I would get a rideable bike. Normal footrests, too high, too far forward, but almost rideable. Conclusion: To build my bike with long tank and short seat, I need footpegs somewhere around the swingarm pivot. So I started building, to be continued.

Monday, April 23, 2012

First day outside

The Beemer is almost ready now.
My dad fitted the fairing with custom mounts for the headlight, clocks, winkers and so on.


Winkers look a bit odd, but that is the way they used to do it, and I wanted to keep the typically BMW alloy blinkers.

Deep oilpan, made for old /5 or /6 centerstand, no reproduction, the real old thing.

Tomorrow: fluids, fork oil, engine oil, gearbox oil, driveshaft oil, connect the battery, mount the sidecovers, check tyre pressure.
And then it will be time for a testride.
Hope the weather will be okay.

Sunday, April 15, 2012

RSC news from down under

Stew Ross sent me some pictures of his 90.
He's made some more progress, really like that pinstripe on the tank, makes me think about getting this tankshape for my RSC90, even though I was planning to make something like the later model tanks.


Note the RSC ignition cover

BMW R90/6 rebuild

It is comming together, thanks to my dad.
frame is newly painted, engine rebuilt with some high compression headgaskets and I'm still planning to put some other carbs on there.
Lightweight clutch and flywheel from the ->'81 beemers
Daytona sump to hold some extra oil, while still being able to use the center stand.


and then we put the tank and seat on, just to get the total picure of what it will look like.

For now with ducati fairing, stays will need to be built, but I'm looking for an MBV or Wüdo fairing, that will look better.
And it isn't ducati, as just about every big caferacer has a 900ss fairing.

Wednesday, March 28, 2012

wheels are back

This winter, the plan was to take my beemer apart as it needed some new bearings for the gearbox and who knew what more.
However we didn't get round to it due to other projects.
So when the first nice sunny days of this year came, and I took it for a ride, I was reminded that the BMW wanted some attention by the whine of gearboxbearings.

The beemer is now fully taken appart, sadly I haven't spent much time on it, as two of my honda engines and my Golf decided they also wanted some attention, and I did want to keep some running transportation.
Luckaly my dad continued on with the beemer, so it is making progress.

Today I recieved a package containing the newly laced wheels.

The glassbeadblasted hubs as they were sent out:


and how the wheels came back:

excel 18" 2,50 rear

excel 19" 2,15 front

A bit wider then standard and shouldered for the classic look.

Thursday, March 1, 2012

How to make your own lightweight valve spring retainers

As the title says, lightweight retainers.
Seen on this blog before because I made them for my oldschool SS50 engine and my earlier C110 engine.
Now I'm rebuilding the original C110 engine that belongs under my C110, also with 60cc so I can keep up with modern traffic, and some more racing tricks, like lightweight retainers.

step 1:

Mount the retainers to a piece of perforated sheetmetal and spraypaint the other side.

step 2:

You now have the pattern of what to grind away, start grinding. I've used a 1mm cutting disc on an anglegrinder mounted in the vice, holding the retainers in vicegrips.

weight before:

weight after:

disclaimer: my scales ar not that accurate, when measured seperately one piece weighs 4 gramms and lightened 3 gramms.
So let's say you can achieve a 25-30% reduction in weight.
No titanium, but it only costs you some time and a little effort, no money.

And this is what it looks like, mounted in a C110 head

Maybe I should get some seethrough valvecovers...