Sunday, February 28, 2010

Manifold

making the flange fit to the port, later a piece of bent tube will be welded to this, but before that is done, it is much easier to match it all up.

All welded, with a piece on the top that was turned on the lathe to fit the CBX1000 rubber that also fits my carb.
There are some edges that needed work, so it is filled up with copper to make it all smooth later.
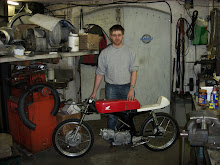
Fitted to the bike, still needs some work though, rounding the edges, smoothing out the connection at the carb and then some paint.


Not sticking out too much.
Now I can just reach the adjustment screws that are fitted to the right side of the carb.

I suspect this carb was intended for a CB125J, where it would be fitted to the other side of the bike so that all the adjustment screws, tickler and throttlecable would be more accessible.


Saturday, February 27, 2010

90 engine

I found out that the gaskets I have for S90 are for the newer style casings and won't fit my old style engine, so new gaskets have been found on ebay that should fit. Just have to wait until they get in. Cranckshaft and gearbox have been checked for clearances in the casings, but then I ran into a problem......
the clutch driveplate is cracked

So that was the end of enginework for now, all other parts are checked, ready to fit when the correct gaskets arrive, but now I also have to find some new clutch parts.

To continue work, I reassembled all the empty casings into a mockup engine so I can make the intake manifold and maybe some more parts like fairing stays and exhaust.
First problem when putting the engine back in the frame, was the bottom enginemount bolt, it doesn't fit past the footrestbrackets.

To be able to take out the engine without disassembling the footrests, I replaced the bottom bolt for a stud.

The front hole of the footrestbrackets allmost alligns with the enginemount, so that the stud can be pushed through.

And then it slides into the frame.

Sunday, February 21, 2010

started on the 90 engine

The SS50 race-engine is off the workbench, so I have room to start on the 90 engine.

As I was working on the footpegs, I had a centerstand bolted under the engine, so to take it out I first had to finish the footpeg mountings.

What I ended up with for the bottom mount of the brackets, are some alloy bushings centered to the holes in the frame, then drilled from the other side thru the bracket so that I have asymetrical holes in the bushings. Still have to make some special washers for the inside of the frame and get some nice, possibly original, bolts, and I want to turn the outside on the lathe so it looks centered with the bracket. But for now the bike can stand to take out the engine.


Not much left of the bike when the engine is out.
Then started on the engine, just some little checks for now. Only modification is the blocking of the oilpipe that goes to the primary drive, as this is a bit redundant and takes away oilflow to the cilinderhead, where it is needed.

Saturday, February 20, 2010

Valve covers

Just arrived in the post yesterday, a set of old-school valve covers fitting the SS50 engines.
Second set from the front, first is a set of original covers, third are kijima, and at the back is something my dad had laying around.


There were actually 4 covers, but the other two are somewhat damaged, so I will put those up fore sale.

BMW

Today my dad got his tanks and fenders back from the painter.
From old parts laying around the workshop he built a sidecar combination for racing, about a year ago. He raced it last season and now it is also being prepared for street use. Tank and fenders were painted black with tipical white pinstriping done by an expert in restoring BMW's


Also back from the painter, the tank for his "Oudshoorn BMW" which will also be built as a (racing) sidecar combination, as this is the only Oudshoorn sidecar frame ever built.

Sunday, February 14, 2010

There was one thing left to do, to get the SS50 "race"-engine closed up and that was the timing cover. I am using a newer style 12V cranckshaft that was laying around, that fitted my imitation inner rotor ignition, what means I have a longer cranck that wouldn't fit under the old 6V cover.

In the old days, poeple used to make big alloy plates between covers for extra cooling, with that in mind I decided to make an alloy ring with fins.

Okay, it still needs some polishing to get it finished, but is does the job. Might be a little much combined with the Kijima finned cover, so I might change that for an original cover. But if this will actually be raced, I need all the cooling I can get.

And some pictures of the complete engine.
In the background you can see the 26mm CB72 carb that will be mounted to it.


The polished left head cover will be changed for some type of homemade revcounter drive, but that is another long-term project......

Friday, February 12, 2010

The carburetor


Some old news, but a while back, I've had the luck to find an original Kei-Hin CR29 carb on ebay in Germany.
The seller didn't know what he had, what meant I got a bargain.

And after some searching, I found an intakerubber that will fit it, comes from a CBX1000. Ordered it from the local honda dealer, so it is fresh rubber. No problems with carbs falling off, as we had with old imitation manifolds on the CB50 racebikes.


Footpegs


Been thinking about the footpegs last week.

Not only do they need to look good, but most importantly they need to be in the right location for me to have a comfortable seating position, to be able to take corners the way I want. You don't want them too far back, because you will be resting on the bars and won't be able to perform minor steering corrections.
Also you don't want them too far down, as they will restrict groundclearance, too high will restrict my movement on the bike.

I could use CB72 cast alloy brackets as seen on some of the original RSC machines, or make a tubular subframe from the rear shock mount to the swingarm-pivotbolt or middle enginemountbolt.
The second option would be more work and I do like the look of the cast alloy plates, so I started with fitting these. They stand pretty wide, what will be a drawback with groundclearance, but I have them and they can be fitted fairly simple.

I made a spacer for mounting the brackets to the swingarm-pivotbolt that also centers the bracket, as a CB72 has a 14mm bolt where the S90 only has a 12mm bolt.


Made from an old wheelspacer. This keeps the plates away from the swingarm, so they can't hit it.

Here you see it mounted, the thin bit is sticking into the bracket, just so far that it doesn't get clamped when the bolt is tightened.

And then this is the sideview, fitted on the brackets are CYB72 footpegs, I don't know if they are both original, but I suspect they are. Have tried original CB72 pegs, and CB72 pillionpegs, but none had a comfortable position. Will have to make cusom bolts to mount the pegs to the brackets as the threads are M12x1.5, not a standard bolt.

And then the next problem, the bottom mounting point isn't centered with the holes in the frame.

Still thinking about how to make supports for this that won't look bodged.
And don't mind the footrests with centerstand that are bolted under the enigine, I just needed something to keep the bike up while working on the footpegs.

Monday, February 8, 2010

Oil cooling plate

Because of racing on short tracks I will probably have a cooling problem, however I don't want to start with a big ugly radiator on my bike if it might not be needed. But my CB50 racebike really needs it, so I am prepared and have an extra cooler ready to mount, but for now I have made a cooling plate on the bottom of the engine, oldschool oil-cooler

Where the underplate is mounted that holds in the oilfilter is perfect to mount a big alloy cooling fin, so I made one. Here some pictures of what I made.


SS50 racing engine

Haven't done anything for the CS90 engine yet, I really want to take my time for that, as it will be the first pre-1970 honda motor I will build. And I know that the 60's stuff is not as simple as the 70's stuff, learned that from my fathers CB72 racers.

I am now busy to clear my workbench from the SS50 engine that is also on there, to make room for building the CS90. The SS50 engine will also get some race-tuning, flowed ports, racing cam, clutch moved to primairy gearbox shaft, 5speed gearbox and small modifications to valves and rockers as seen in these pictures:

homemade thin copper headgasket, higher compression and reusable
made the valvestems thinner where they stick into the ports, to let more air by and also to reduce weight, will do this for the CS90 also.
lightened rockers, saves 4grams compared to standard


and this would be the pile of parts that might someday become an SS50 racer, and would get the engine that I am now building. Most parts left over from my other projects.


Friday, February 5, 2010

My daily driver

This is the SS50Z I use daily to drive around town.

It is just a moped, but it is the fastest way to get around Utrecht, less traffic lights and no problems with one way streets.

Many parts are not original to this bike, allmost everything except the frame.
Some changes still to be made before it goes to the painter, but I haven't decided on a color yet.


Thursday, February 4, 2010

Dipstick

After work today I went to the workshop for a few hours, because I wanted to get my dipstick sorted.
On the lathe I drilled out the original stick in the center with a 2.5mm drill and tapped 3mm metric threads into it. This perfectly fitted an old spoke that was laying around, secured with an M3 nut.
Then figured out the correct length by comparing it to an original CS90 dipstick on an old clutch cover and made some notches in the end to indicate top and bottom oil levels.


Wednesday, February 3, 2010

Breather

Just in today; my "dipstick" for the breather unit that mounts to the original dipstick hole.To bad someone has cut of the dipstick part in the past, but the labyrinth is okay, I'll make a dipstick onto this to fit my engine.
will look good wenn mounted, but most importantly, it will reduce the amount of oil that is blown out, because the dipsticks that I had were all for the lower type C110 breather that has an external labyrinth.